Saturday, December 15, 2012

Toddler Fun!

"It is not what you do for your children,
but what you have taught them to do for themselves,
that will make them successful human beings."
~Ann Landers

As a busy mom throughout the week you sometimes miss out on the fun things with your kids.  My weekends are reserved for catching up from the week.   I love having those lazy weekends around the house with my family.  Our little one will be turning 3 in about a week and she is a bundle of energy that sometimes is very hard to keep up with.  Keeping her engaged, learning and having fun can be a challenge.

I'm always on the lookout for fun and different things for her.  Today's project was no exception.  It was easy; took me about 10 minutes and she is already having fun.  Something so simple that brightened up her day.

Let's jump in .... 

Supplies are minimal and I had all of this in my craft supplies. 

  • Scissors
  • Sharpie
  • Popsicle sticks
  • Velcro
It's pretty easy to throw together.  You could do this with numbers or letters, but at home we are working on letters and words so we opted for letters.

You may want to plan a little in advance and think of words to fit your child's level.  My daughter is three so we are working on easy words, (e.g. STAR, PIG, MOM, DAD, RAT, BOP, etc.).  You just want to put the prefix on one side of the Popsicle stick and the suffix on the other.

You can see we now have a nice combination of words to create.  Now we need a way for them to be formed.  Bring on the Velcro!

The Velcro I keep in my crafting supplies is a large roll.  You can see there are two strips: one is the sticky side and the other is the soft side of the Velcro.  If you cut into strips you just have to match up on your ends.

Here's a close up look at the Velcro strips.  The soft side goes on the suffix side (on top) and the sticky side goes on the prefix side (underneath). 

When you do it this way you can see that now we can then stick them together to form words.  Easy peasy.

I'm not biased or anything ... but this was my favorite combination of letters. 

Once you've done this on all your Popsicle sticks you are complete!  For older children you can make this a match game.  One side has the animal name, the other has the sound it makes, (e.g. PIG on one stick; OINK on the other).  Do it with math by putting the math problem on one side and the answer on the other, (e.g. 1 + 1, on one side; 2, on the other).  The possibilities are endless. 

And just like that, it's play time.  She is already having fun by attaching the words and likes to shout out the letters.  Of course she has also discovered this is a fun way to make shapes, (we've experimented by making a square and a very large circle!). 

Have fun with your little ones.  Enjoy your moments. 

Crafter Level: Novice

~Jacqui


Sunday, December 2, 2012

Thank You VIP Gifts

"Be who you are and say what you feel,
Because those who mind don't matter
And those who matter don't mind."
~Dr. Suess

With my home business I want to make sure to not forget the customers who have been loyal to me.  I am a huge believer in treating others as you would like to be treated and with my business that is no exception.
With December being the last month of the year I am creating VIP Care Packages for my loyal customers.  It may sound simple, but it's my way of showing that I thank them for their continued business throughout the year.  Any business needs customers to succeed and my home business is no exception.

If you do any type of home business or even for your co-workers, bosses or leaders at your job, the teachers at your children's school, even the postman ... all of these individuals make a difference in our lives throughout the year.  Saying thank you in a unique way is a small token of what we can do to appreciate them all.

I found these adorable gift boxes at my most frequented store, Target, (I should seriously start asking about stock options...) so I had to pick up a bunch to have on hand.  These are the perfect size to give a gift to my V.I.P. customers.

As always - any gift, small or large sends the same message: thank you.  Depending on what you want to give these types of boxes may or may not work.  However I did see that they had other sizes in the gift section. 

Does this step really need explanation?  Doubtful.  To dress it up just a bit I threw in some tinsel.  Doesn't everyone love tinsel this time of year?!

Now we just need a cute tag on the front.  You can buy pre-made tags at any hobby/craft store but I like to use what I have on hand when I can.  I took red construction paper and cut a tag shape with my paper cutter.

Dress up the tag with some fun stickers or embellishments. 

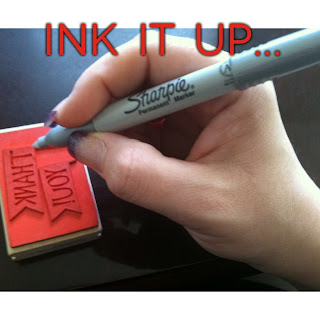
I used both letter stickers and a 'Thank You' stamp.  You can use a marker or ink pad on your stamp; I love the versatility of it.  I do this method often when making my own handmade cards and invitations.

Once you have your tag complete, stick to the front of the box.  Inside is a small card that I did a hand written message on to personalize my gifts for my individual customers.  

I'm not telling my VIP's about these.  I want it to be a surprise they are receiving them.  After all, the 'magic' of the holiday season is what really makes this time of year stand out.

Take the time to thank those people who contribute to you, your children or your friends.  A thank you goes a long way .... 

~Jacqui

Crafter Level: Novice

Good Neighbor Gifts

"A good deed
will make a good neighbor."
~Bantu Proverb

In the midst of all the busy hustle and bustle of the holiday season it can sometimes be easy to overlook the ones closest to you.  This year I am bound and determined not to do that.
I really wanted to do something sweet and simple for my neighbors and thought that I could give something fun and a little different than what they normally may receive.  To include a personalized touch I thought I'd take the concept of a card and gift and put it together into one.

So these are my good neighbor gifts that I'm delivering to doorsteps this week.  Just a little something to let them know we are thinking of them and wishing them and their families a very happy holiday.

Let's dig in .... 

Supplies are easy and you may have them on hand already.  First I picked a gift that was fun and unique and that was a circle freshener.  I started thinking ... what could I do with this to also do the card elements???  Circle = snowman.  Genius.

  • Construction Paper
  • Scissors
  • Hole Punch - I use my star punch, it's my favorite
  • Small diameter glass to trace a circle, (or a circle cutter if you have one
  • Tape Runner/Glue Stick/Glue dots
First I needed to trace the circle for the head of my snowman.  I used this glass to get the shape and then simply cut out.

Now you just take the different colored construction paper and start cutting shapes.  First off - every snowman worth his weight in snow needs a top hat.  Next, a small oblong triangle for the nose.

For his eyes and buttons I cut out stars using black construction paper.  Quick and easy with these punches.

Now we need to put it all together.  I love my tape runner but you can of course use a glue stick or glue dots for everything.

Last step is assembly of all your snowman parts.  I stuck everything directly to the package to create the snowman shape.  Depending on the gift you choose to give your placement will vary.

And here you see the final product.  My snowman all dressed up and ready to give out.  I attached a fun ribbon at the top and plan on tying a bow big enough so that I can simply place on the front door of my neighbors.  On the back is a short note that says:

"Thank you for being such a sweet neighbor.
We wish you the best this season.
A small gift of a sweet scent for your car for your sweetness all year round."

I hope they find this to be a fun surprise and cannot wait to see what they have to say.

The holidays are a fun time of year to thank those in your life.  Make sure you don't forget the people around you.

~Jacqui

Crafter Level: Novice