Saturday, November 10, 2012

Stocking Stuffers and Fun Holiday Gifts!

"I will honor Christmas in my heart,
and try to keep it all the year." 
~Charles Dickens

If you know me even a little, you know my favorite time of the year is upon us.  I'm already gearing up for my annual Black Friday fun, planning Thanksgiving with my two sister-in-laws and of course am already getting my gifts ready for my staff at work, friends and those select few who I just want to surprise.  This little project is one of those things that is so easy, simple and cute that you could use almost ANYTHING to do this with.  I have chosen some anti-bacterial foam bottles and thought it would be great to buy and then give out as gifts in my holiday gift giving. 

I love to give something a home made touch in my holiday gift giving because to me that adds just a little more meaning to the gift.  After all, it's the spirit of the giving that really matters anyway.  Let's jump right in here ...

This supply list is super simple and you probably already have it all. 
  • Your gift - pick any little gift you'd like, such as sanitizer foams like I did, hand soap, lotion, chap stick, etc. 
  • Ribbon - pick your color according to your gift.  If doing the Santa belts you can also use black electrical tape
  • Metallic Sharpie - pick your color
  • Scissors - Just for some quick snips
  • Tape Runner/Double Sided Tape - your choice
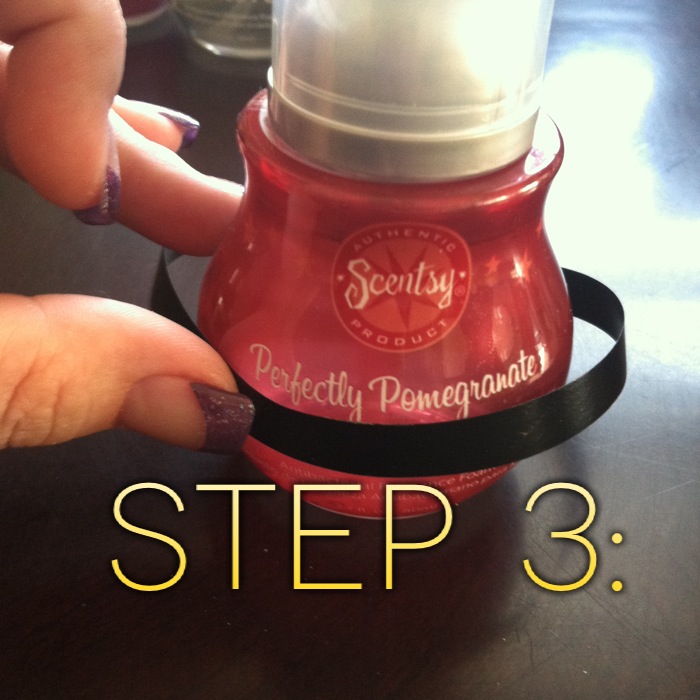
And that's it.  Now ... let's get creative here!!  We'll start with Santa - where else do start when you think of holiday gifts?!


 Measure out your ribbon to fit the gift.  I overlapped mine a little.  Then cut to size.

I then took my tape runner and did little small 1/2" tape along the ribbon paying special attention to the ends.  This just helps it stay in place on your gift.

Line it up where you want it and then stick down.  Make sure your ribbon lines up so you have one nice black ribbon all the way around.

Now, take your metallic Sharpie and draw a buckle for Santa's belt.  I used silver as my preference color.

And there you have it!  A cute way to give your gift a fun holiday twist!  Simple, easy and so cute!!

Now ... we are going to try this same concept in some different ways ...

I do have some men in my life who need gifts and of course when giving to a man, you can make it 'cute' - it has to have some masculine traits to it.  So I thought I'd do a fun, different take on the ribbon concept.  Borrowing from a fictional character ... I call this my Grey Gift. 

Take your ribbon and measure out and use the tape runner just as you did above.  Only this time I'm not doing a belt - I'm doing a black tie.

Take a shorter piece of ribbon and then cut a v-shape at the end to simulate the tie look. Then just tape on to the top ribbon so that it hangs down.

See how quick this was?  Simple and yet totally gave this one a different look altogether than the Santa belt.  Perfect for any man on your holiday gift list.

Let's go for another try to mix it up a little more ...

Using silver ribbon this time I wanted to give this one more of a 'gift' look so it was more present-looking.  I took the ribbon and pulled out a nice stretch of it and then just cut a v-shape just like in the above example to just make our ribbon look a little dressed up. 

Adhere along the top of your gift and again, use the tape runner to help adhere it to the package.  Then, you are just going to tie a simple bow on the front. 

You could trim up the ends and be done here.  However since I'm using curling ribbon I wanted to take it up one more notch and I took the back end of my scissors and ran down the ends of the ribbon to make it curl up.

Here you see the ribbon is curled just like a present.  Another look to make it just a little different than the others.

And we are gonna go for one last look.  This one is clean, simple and perfect all year round.  Since my gift of choice this time is an antibacterial foam, I thought I'd do a play on words.  Everyone has heard of the catch phrase, "get milk" ... and so ...

Since this gift has more of a gold color I used my gold metallic Sharpie.  Then, I just wrote on the lid.

"get clean"  I know .. pretty clever.  You could write absolutely anything!  Their name, birthday, catch phrase ... anything at all, and again, this is one you could use all year round. 

Let's round all these little guys up ...

So here's our little mixed group of gifts.  Same concept on each, just with a different twist.  I'm sure you probably have a ton of other ideas to do with this as well.  I'm already thinking of some other cute gifts to give out using this same concept!  You can do this with anything!!  Have fun during the holiday season!

Crafter Level: Novice
 ~Jacqui


Sunday, November 4, 2012

Chic Gift Giving

"The manner of giving
is worth more than the gift."
~Pierre Cornielle

November is the month to be thankful.  One of the things I am thankful for is the people in my life whom I can give gifts to.  I don't want to just give any gift, I want to give something that means something.  Something that shows that person that I took time to do something special just for them.  This is one of those little crafts.
This is a craft that again can be done all with materials you probably already have.  And another great project in which we are up-cycling rather than throwing away.  I like those kind of crafts.
 
This is something I made up for my home business, however it is something that can be used for any occasion.  A fun way to wrap money rather than in a regular card.  A small pair of earrings or candy to give out as a thank you.  Absolutely anything you can think of that would fit in this little homemade box would be perfect.

So let's get to it, shall we?  What do we need for these chic little gift boxes?
  • Toilet Paper rolls - I told you we were up-cycling here.  Why just throw these little guys away when you can make a cute gift box?
  • Ribbon
  • Cardstock/Flier - I did this sample for my home business but works just perfect with thick or thin cardstock in any color or pattern
  • Paper Cutter - Not mandatory, but this paper cutter is a staple in my craft supplies.  A quick way to cut paper up to 12" x 12"
  • Tape Runner/Glue Stick - Simply preference here, doesn't matter which you use
  • Gift - My gift in this example is a wax sample, but as mentioned above could be anything you want to give
  • Hole Punch - I use my handy dandy star punch for a lot of my crafts and this was no exception
So jumping right in ....
If you use a pen you can quickly mark off the width of your paper so you know where to cut so it is the same width as the toilet paper roll.  Then I placed in my paper cutter and cut to fit.

I lined up what part of the picture on my flier I wanted to show on my gift box, but if using plan card stock, no need to worry about that; cut to fit the roll.  Above you can see I just wrapped the flier around it quickly to get an idea of where to trim off.

Now we need to adhere the paper to the roll.  I used my tape runner and ran some tape along the bottom and about every 1/2" up just so when I stuck it on the roll I would get a nice, secure stick.

Roll up with your tape/glue and press down so that you have a nice secure fit.

Now to make the sides.  Take one end and bend in so you make a crescent shape on one side as you see above.  Then, repeat on the opposite side to close your gift box.

Here is what it looks like with the side bent in to close the box.  The toilet paper roll holds in place nicely so no need to tape or secure.

Now for the entire reason you are making this: the gift!  My example shows a wax sample that I'm giving - but remember anything you can fit inside would be perfect!  Cash, candy, small jewelery - the possibilities are endless!

Once your gift is inside you simply repeat on the other side of your roll and close up the end by using the crescent bend.  Again - the toilet paper roll is perfect for these little gift boxes because the cardboard holds perfectly with no need to seal it shut.  As you can see also, I lined up my paper so that I had the picture I wanted on the front of my gift box.

Add a tag to your gift.  "Thank you!" My example I am using one of my business cards but you can put absolutely any tag on this.  A short note, thank you or advertising.

To put the finishing touch on, I added a ribbon around it and threaded through my card, (or gift tag) to attach.  Tie a simple bow.

The front view you can see ties up the gift perfectly. 

The back view is clean and sharp.

And there you have it!  A chic little gift box that took about 10 minutes to make.  

I plan on using these a lot in my home business and also for my nieces/nephews whenever I am wrapping up their smaller Christmas presents.  For that I will be using just regular holiday wrapping paper.  Again - all materials I'll have on hand and won't cost me a single dime.  (might I note a perfect use for the toilet paper rolls in my home!)

Enjoy and have fun!  This is the gift giving season - so make it count!

Crafter Level: Novice

~Jacqui


Saturday, November 3, 2012

Up-Cycled Gift Bags!

"No one has ever become poor from giving."
~Anne Frank~ 


I love finding ways to up-cycle items rather than throw away.  I think it's always great to re-purpose something and give it a new purpose.  I saw some ladies do this with fliers and thought it was simply amazing.  As an Independent Scentsy Consultant I always have extra monthly fliers hanging around and I never really know what to do with them except trying to continue to pass them out.  But let's be honest ... most people don't really pay attention to the same flier, (just a different picture) each month.  I needed a new way to really use these fliers in a fun and different way.

I cannot take credit for this great idea - as many other crafty ladies have done this before me - however here is my take and step-by-step directions.  You can do this with any flier or even a good cardstock with a great design.  Why continue to buy new bags each and every time you want to give a small gift?  It's an extra expense that you can cut out - and hey, I'm all about lowering my overhead costs as a business owner.

So let's start off with the essentials; the supplies.
There really is only a few supplies you actually need for this and if you are a crafter/scrapbooker or even a mom who sometimes tries some crafts you probably have everything you need. 

  • Decorative scissors - you don't need these, they simply dress up the top of the bag a little more
  • Scoring Tool - if you don't have one, you can use the back of a plastic knife or even a credit card
  • Tape Runner and/or glue stick - I prefer the tape runner as it's quick and easy and adheres very well but glue sticks work fine
  • Fliers and/or cardstock - All about preference here.  Perhaps you are also a business owner and use fliers each month, or maybe you have some cardstock in your craft supplies - either one would work
  • Ribbon - totally optional.  I used it to tie my bag together at the top, but you don't have to use this
For this size bag it takes only 3 fliers to make.  Take all 3 fliers and lay side by side.  Take your tape runner/glue stick and run a strip down one side of each flier to stick them together.

After you have done that you can see you now have a line of fliers ready to go.


Take the edges of your long flier and do your tape runner/glue stick and create a cylinder shape. Now you just need to start making folds.  When on this step think of wrapping a present.  We are going to do folds in the same way.

Pick the side of your cylinder that will the front of your bag.  Center that and fold along both sides so you now have a flat surface.  Then you can eyeball about 1" from each of those folds and fold on both sides of that fold.  Good tip: when doing your folds, use the flat end of your scorning tool to really sharpen your folds.  Once you have those, push in on the sides of the bag and create the in-ward fold of the bag.  Picture the brown paper sack from the grocery store.

Once flat again you can take your scissors and cut across the top for a decorative edge.  It's all about presentation, right?

Now the bottom of your bag.  Remember when I said think of wrapping a present?  That's because the folds we are going to do here are just like you are wrapping the bottom of a present.  Fold in on the side and then up on longest sides.

Now just take your tape runner/glue stick and go along those inner edges so that you can create a good seal.  You want to get this as tight as possible so be sure your tape/glue is done well.  This is the bottom of your bag and the last thing you want is the bottom to fall out with your fun gifts inside!

Once you have your tape/glue, then stand up your bag and push down on the inside to secure completely.

So here we are.  Basically done at this point ... here is a side view so you can see those folds a little better.
Here I took a hold punch and just did two holes on both sides of the bag so that I could insert my ribbon.  Again, ribbon is optional, I just thought this would work as a great presentation and go with my Christmas gift theme.

I threaded the ribbon through my holes and inserted my gift.  Then I just tied up the ribbon in a cute bow.

Seriously ... this whole project took maybe 8 minutes to do one bag.  You could do different sizes if you wanted to by using more fliers or larger cardstock.  I suggest if using a cardstock to dress it up a bit.  Embellish with stickers, buttons, lettering ... anything that will make it stand out and show that you took the time to not only give a gift but to give them a bag that you created just for them. 

I am using these for a lot of my holiday gift giving this season - not only for my Scentsy business but for my friends/family using cardstock options.  I am really excited to try using just some brown paper (bags) without a logo and then using stamps to embellish with the To and From.  :)  Have fun with this project!  It's easy and a great way to up-cycle what you already have on hand!!

Crafter Level: Intermediate

~Jacqui