"Yesterday is history,
Tomorrow is the future,
Today is a gift;
That's why it's called the present."
Matchbook Gifts
I did this project for my Scentsy business but it can be used for almost any little gift you'd like to give. A fun way to present something that's a little different, a little unique and a little bit you. That's the whole point of a gift, isn't it? Putting your own personal spin on it? I think so anyways. So here goes ....
So here's the complete, short and sweet of this project. As you can see, you end up with a cute little matchbook gift to put almost anything in. Kind of takes the boring out of just the regular ol' gift.
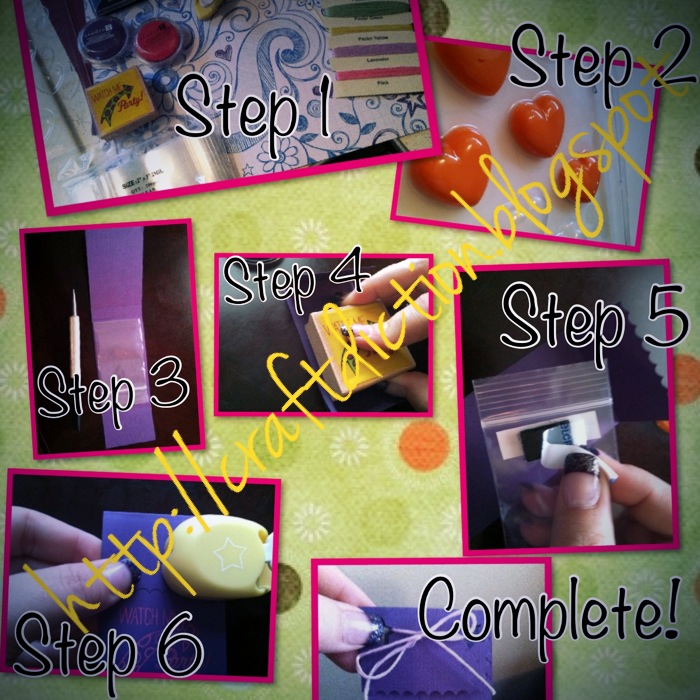
I guess we'll follow the rules and start with Step 1: supplies.
Let's be honest here ... before doing any project, (including even cooking dinner) please, please, please take my advice and gather everything you need before starting. Being organized is the absolute key to any and EVERY project. (insert little life lesson here)
The supplies above kind of show an overview of your options. The basic supplies are:
- Cardstock - you want a nice weight to your cardstock, not a flimsy paper,
- Scoring tool - find this in the scrapbook section of your craft store (one of my favorite craft items)
- Paper cutter - not pictured above, but again, when cutting long pieces, this is something that is a lifesaver. Find in the scrapbook section.
- Small bags - I am placing my gift in the baggie, if you simply have a gift that doesn't require a bag to enclose it, this isn't needed.
- Thread and/or small ribbon - I've used scrapbook thread, but a small width ribbon would work perfectly as well.
- Stamp and ink pads - Of course pick the stamp for your occasion and the color to offset from the paper you will use. You don't want your stamp getting washed out in the paper and lost to the eye.
- Velcro, staples and/or double-sided tape - Use this to attach your gift to the matchbook. Pick your poison on which to use to attach.
- Scalloped scissors - decoration for the lip of the matchbook.
- Hole Punch - one of my favorites in my small star punch, but you can use any type.
Step 2: Scoring the paper and setting the stage
I used 12 x 12 card stock and simply cut a long enough strip that would accommodate my baggie. I placed my baggie in for a measure. I needed to know where to score my paper. What's scoring? If you have ever scrapbooked, you will know that this is a fun way to decorate and use to manipulate your paper. The scoring tool allows you to make an indention in the paper; this allows for a nice point of fold. Here, I have scored above the bag, below the bag, and about 1/2" below that. This is where my folds will be.
Step 3: Decoration for the top
Using one of my scalloped edged scissors I simply cut the top of my card stock. This way the lip of the matchbook will have a fun little design to it.
Step 4: Securing the folds
As you can see above I am finalizing my folds. Where I have scored the card stock I flip my scorer tool around and there is a flat edge to it. Use that to crease the three score marks you just did, (i.e. above the bag, below the bag and about 1/2" below that). Now you have sharp folds.
Step 5: Stamp it up!
I wanted to decorate the front of my matchbook so I used a stamp and a bright pink ink. Again, select your ink color to complement your paper color. This pink really pops off the purple.
Step 6: Add in the goods
My matchbook gifts include a Scentsy wax sample. So, I've warmed some wax and melted it down, then poured into a candy mold. Place in the freezer for about 5-7 minutes to set the wax, then pop out. Then I used Velcro. I cut a small piece and attached one to the back of my bag and the opposite side to it. The Velcro comes in a long strip with double-sided tape, so all I have to do is pull off the paper and adhere to the inside of my matchbook. Now when my recipient wants to, they can simply pull off the bag or put it back in.
Step 7: Finishing up ...
At the top of the matchbook on both sides I punched a hole using my star punch. Then, I threaded the purple thread through to tie it off and keep the matchbook closed until it's time to open.
And now ... completion! The side view shows that there is plenty of room inside no matter what you put in; it all depends on how far apart you do the #2 and #3 score marks on your paper. Perfect for little candy treats or other fun give-a-ways.
Front view:
So there you have it. Pretty easy. Not too many materials needed and didn't take long at all. The best part about these is being able to be as creative as you want. Different paper, different goodies inside, stickers, ribbon, thread, etc. I'm thinking of making up some with Christmas card stock to put candy in for my employees. Possibilities are endless!
Crafter Level: Novice
~Jacqui


No comments:
Post a Comment